November 12, 2021

How to do rogue AP attack in Linux using WifiPumpkin3


WifiPumpkin3


A rogue access point (or AP) is a wireless access point that is not managed by your network administrator because it is installed on your network without your permission. Rogue APs do not have the same security settings as other access points. These APs are physically located behind a network firewall. This means that anyone who has access to the AP has access to a wider network.  A rogue AP is a wireless access point installed on a wired network infrastructure without the permission of the network administrator or owner to provide rogue wireless access to the network's wired infrastructure. There is likely to be. Anyway, rogue access points can be used in a variety of attacks, including denial of service, data theft, and other malware implementations.
In this post we are going to use WifiPumpkin tool. Wifipumpkin3 is a powerful framework for rogue access point attacks which is written in Python that allows security researchers, red teams, and reverse engineers to set up wireless networks to carry out man-in-the-middle attacks.


Features -
 

  • Creates rogue access point attack
  • Good for Man-in-the-middle attacks   
  • Plenty module for deauthentication attacks
  • Provides Rogue Dns Server
  • Can intercept, inspect, modify and replay web traffic        
  • Provides DNS monitoring service
  • Can harvest credentials
 
 
Installation


1) Update packages


$ sudo apt-get update 


2) Install required packages


$ sudo apt-get install hostapd python3.9-dev libssl-dev libffi-dev build-essential python3.9 python3-pyqt5


3) Install wifipumpkin3


$ git clone https://github.com/P0cL4bs/wifipumpkin3.git
$ cd wifipumpkin3
$ sudo python3 setup.py install


4) Now just run this tool by typing -

$ sudo wifipumpkin3


If you have any problems regrading this, please comment below.


Also Read -

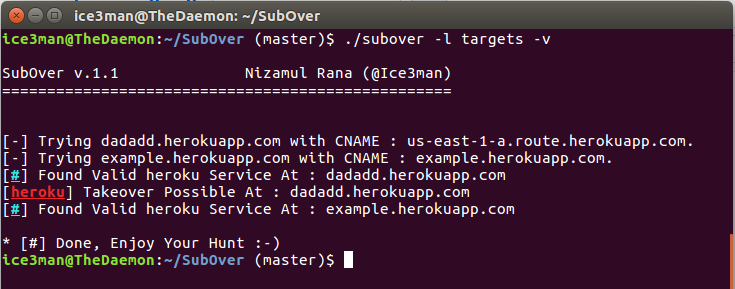
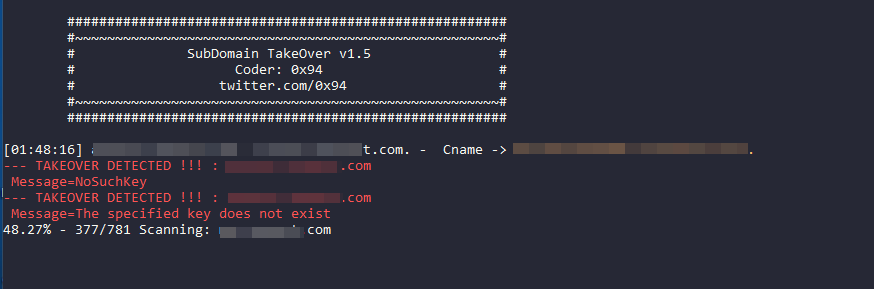
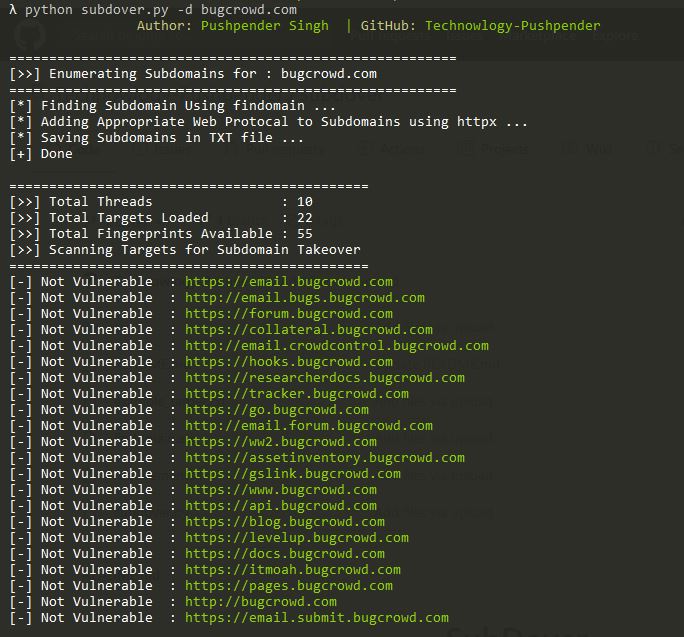
Top 5 Subdomain Takeover Tools for Linux [2021]

How to install kali linux repo in any debian based distro 


November 8, 2021

Top 5 Subdomain Takeover Tools of Github for Linux [2024]


Domain Takeover Tools from Github

Obtaining a subdomain is an attack in which an attacker has complete control over the subdomain. This happens when the provider deletes the web content on the domain but forgets to delete the DNS record.
This error could allow an attacker to gain control of a subdomain, which could allow an attacker to perform any type of attack using that subdomain, including phishing and mapping.
To find out which subdomain is easier to control, you need some tools to find that particular subdomain. That way, you can prevent such attacks. Here are some tools to help you identify subdomains that are easy to adopt.
This will help you find that subdomain. These tools are free to use and display results in less than a minute.

Here are some tools to takover subdomains -


1) subzy

Subzy is a golang tool which helps you to find which subdomain is ready to takeover.
 

Link - https://github.com/LukaSikic/subzy


2) SubOver

SubOver is likewise a Go language based tool. It can undoubtedly identify and report vulnerable subdomain that can easily takeover.

Link - https://github.com/Ice3man543/SubOver


3) takeover


takeover is a Python based tool which recognize a subdomain which is not difficult to takeover.


Link - https://github.com/m4ll0k/takeover


4) subdomain-takeover


This tool also a python based which helps you to find which subdomain is ready to takeover.


Link - https://github.com/antichown/subdomain-takeover


5) subdover

Subdover is a MultiThreaded Subdomain Takeover Vulnerability Scanner Written In Python3, Which has more than 70+ Fingerprints of potentially vulnerable services. Uses CNAME record for verification of findings.


Link - https://github.com/PushpenderIndia/subdover


If you have any query, please comment below.


Also read -

How to do phishing attacks in termux using SocialFish

How to create metasploit payload easily in linux & termux

How to install gui in termux